We can actually save a "Batch" of photos all at once!!! You will be blown away at how easy this is and how much time it will save you! Now before we start on our batch, we need to do a bit of set up. You will only have to do this once. After you go through this tutorial, you will have everything you need to press a few buttons and quickly save your batch of photos from now on.
The first thing we need is a Photoshop Action that will take our high resolution photos and reduce the size of them for us. Since images also tend to lose color and become a bit blurred when posting them to the internet, we will go ahead and create our action to take care of that too. If you are already familiar with creating Actions or if you already have an Action that will do this, feel free to skip the first 1/2 of this tutorial. If you are not familiar with creating Actions, don't be alarmed. I assure you it is waaaay less intimidating than it seems. So don't think about it... just jump right in here with me!
1.) Open a photo in Photoshop. Any photo will do. This is just our "bait" photo to create our action. Just make sure it is a high resolution photo (300dpi).


3. Once you see your Actions Palette, click on the folder icon to create a new action set.

4. Name your new action set (in this case, I'm calling this set "Resizing Tools") and then click OK.

5. Now on your Actions Palette, click the New Action icon . When your New Action window comes up, simply name your action (in this case, I've called it "Prep for Web") and make sure it is going to the Action Set you just created. Then set the other settings as desired and press Record.
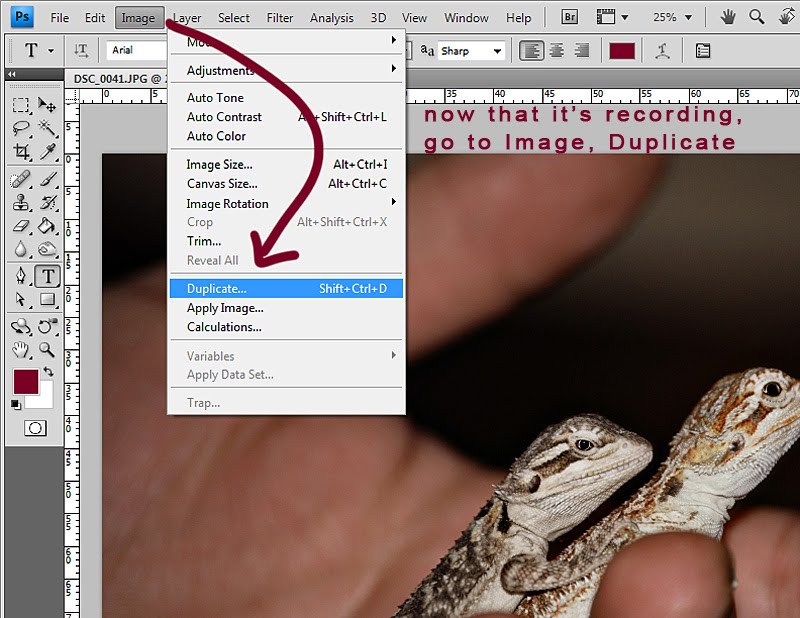
6. Photoshop will now begin recording your steps. You will know it's recording by the red button on your Actions palette being activated... much like a VCR.

7. The first step we want is to duplicate our image. (This avoids accidentally saving over our high resolution photo.) So go to Image and then choose Duplicate.
8. When the title box comes up, there's no need to change the name. I always just leave it as is.

9. Now let's resize our photo. Go to Image and choose Image Size.

10. Now change the settings as follows. Be certain to choose Bicubic Sharpener (best for reduction). This is what will sharpen our image so it doesn't appear all blurry on the web. Then click OK.

11. Now let's tweak the saturation to keep it from looking bland once it's posted on the web. Go to Image and choose Adjustments and then Hue/Saturation.

12. Now simply give the saturation a little boost. Be subtle. Between +6 and +10 should work for most photos. Then click OK.

13. Now we want to tell our action to save our new image. (*NOTE:So that we will be able to use our "Prep for Web" action for saving individual items as well (such as scrapbook pages or previews), you will want to save it to the same folder as your high res photo. For our purposes here, you can go back into that folder and delete the low res copy once you are finished creating your action. But by saving it to the same folder as your high res image while you are recording, this will tell your action that normally (when you are not saving things in bulk) that you want to save your new low res image in the same folder as your high res image... it will make it very easy to locate. Does that make sense?)

14. Now simply close both of your open photos. If you are asked if you want to save your changes, click No.

15. That's it. Our action is created. Now simply press Stop.

16. If desired, you can activate your options and choose Button Mode.

Button Mode is a preference. I like it because instead of having to find the action set, then click on the desired action, and then press play, all you have to do is scroll down to find your action and press it. (Hey... those fractions of a second it takes for those extra steps can reallllly add up! hahaha). But also in Button Mode, you can assign your action a color that will make it stand out. For actions you use quite often, this is a DREEEEAM!

Now for our Batch...
Once you have your action created, all you have to do is run your batch.
1. Click on your Bridge icon to launch. (Or you can go to File and choose Browse Bridge)


2. Once your Bridge is open, choose Pictures and then double-click on the folder of pictures desired.

3. Now just click on any one of the photos in that folder.

4. Now choose Tools, then Photoshop, then Batch.

5. The top section is labeled Play. This is where you tell your batch what action you want it to perform on each photo. So you will choose the Resizing Tools set, and within that set you would choose the Prep for Web action.
Under the section labeled Source, you will be telling your batch which photos you wish to run your action on. So choose Folder (or Bridge, whichever you choose to pull from), and then click the Choose... button. Now choose the folder from your computer in which these photos are located and click OK.

6. The bottom 1/2 of the window is your Destination section. This is where you will tell your batch what to do with the photos after it runs the action on them. I usually create a folder within my photos folder called low res. So the destination of your low res photos will be that folder. Go ahead and check "Override Action 'Save As' Commands, even though we didn't create a 'Save As' step in our action. There may be 'Save As' steps in other actions and after your first batch, it should remember it's settings.

Then under File Naming, this is of course where you tell your batch how to name and organize your photos within their new folder. Here is how I named mine and the function of each field: goku+z (this tells me what the pictures are of) _ (an underscore sets the file name up for the next reference, which will be serial number) 3 Digit Serial Number (which I have chosen below to start at 1) - (sets the file name up for the next reference) low res (this is so I won't ever get the low res mixed up with the high res) extension (of course, this will be .jpg or .png or whatever.)
(*NOTE: In the example they provide, when you choose "extension" it defaults the example to show it as a .gif file. This threw me at first. I thought it was trying to make MY file a .gif file. It took me forEVER to realize that it just pops an extension in there to show how it looks. Yeah... i felt kind of silly. It will know which kind of extension to place on your file. hahaha. Anyway... now the fun part... once you're done with the file naming, click OK and then sit back and watch as Photoshop does allllll the work. You don't have to touch another button until it's time to upload them to the web! Whether it's 10 photos or 200!
Now, you have a nice folder with your high resolution photos for printing, that contains a sub-folder with low resolution photos for posting to the web! That is an OBSCENE amount of time saved everytime you sit down to resize your photos!!


